
Many users of RedLine13 are familiar with our web interface for running load tests. Yet, are you also aware that we offer a full-featured API? In this post we will walk you through how to get started with the RedLine13 API. We will provide examples that show you how you can leverage this powerful feature to achieve new levels of automation running your load tests.
Almost any task that can be accomplished using the web UI can be automated with a backend script using our API. Many of our customers create scripts using PHP, cURL, Python, PowerShell, C# and other languages. Under this paradigm, it is possible to abstract repetitive manual testing tasks. Some customers have even automated part of their testing into continuous integration pipelines and deployment architecture. (Note: API access requires a paid plan. If you don’t have a basic or premium plan, you can purchase one here.)
Obtaining an API Key
One of the best ways to understand our API is by example. However, before we can use the API we will need to set up an API key. You can think of this key as a special kind of passcode that grants you access to RedLine13 resources. Below we will review step-by-step how to generate and use your API key.
Step 1.
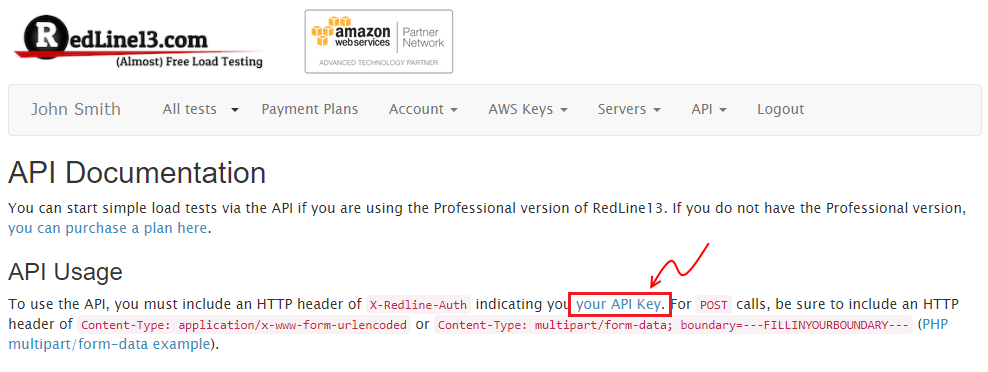
Navigate to https://www.redline13.com, and log into your account as per usual. From the main menu, select “API”, then “API Overview”:

Step 2.
From the “API Overview” page, under “API Usage” you will find a link for “your API key”. Follow this link to the “API Key Manager” page:
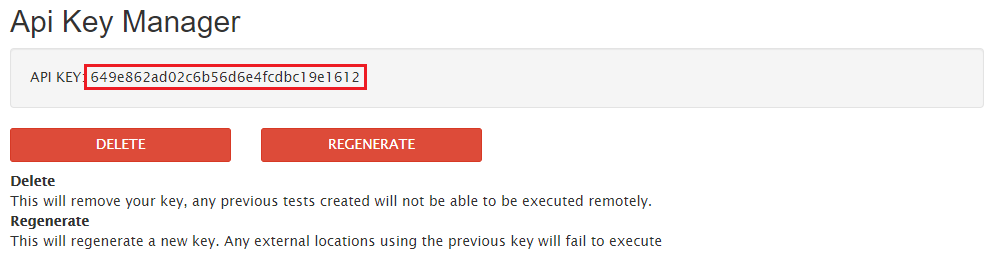
Step 3.
If you have created an API key, it will already be listed here. If that is the case, you may skip to the next step. Otherwise, under “API Key Manager”, click on the green “Generate” button and a new API key will be created for you:

Step 4.
Once your API key has been generated, it will appear for reference on the “API Key Manager” page as follows. We will want to copy this key as it will be used later in this article when we build actual requests against the API.
Creating your First API Request
API Resources
Once the API key is created as outlined above, we are now ready to build some requests. You can find a complete list of API resources on the API Documentation page, however here is a brief overview of available operations:
| Resource | Method | Description |
| /LoadTest | GET | Search for your load tests. |
| /LoadTest | POST | Start a new load test. |
| /LoadTest | DELETE | Cancel or delete a previous test. |
| /StatsDownloadUrls | GET | Get stats download URLs for a test. |
| /Metrics | GET | Access metric data for a test. |
| /Percentiles | GET | Access percentiles data for a completed test. |
| /Errors | GET | Get errors for a test. |
| /Share | POST | Obtain a shareable link for a test. |
All requests share the common base URL of https://www.redline13.com/Api. To construct the URL of a specific resource, we simply append the resource identifier from the above list. In the following example, we will be searching for completed load tests and as such our fully qualified URL should look like this:
https://www.redline13.com/Api/LoadTest?state=completed
|
Referring to the LoadTest resource documentation, you will find a number of API parameters that may be specified. In the above URL we have set state equal to “completed” such that only load tests which have completed running will be returned in the response. However, before we are ready to actually make this call we need to set our API key as obtained previously. In order to do that, we will need to set this value as a request header parameter. While in practice this can be done in any programming or scripting language, we recommend for API testing to use an API client such as Postman.
Building the Request
Since these example requests will be made against your own RedLine13 account, there is the prerequisite that you have at least one load test that you have run in order to have interesting data returned. (If you have not completed your first load test, see this post to help you get started.) You will also have to specify your API key that we went through the steps to obtain above. This is accomplished by setting the “X-Redline-Auth” header in the request as follows:
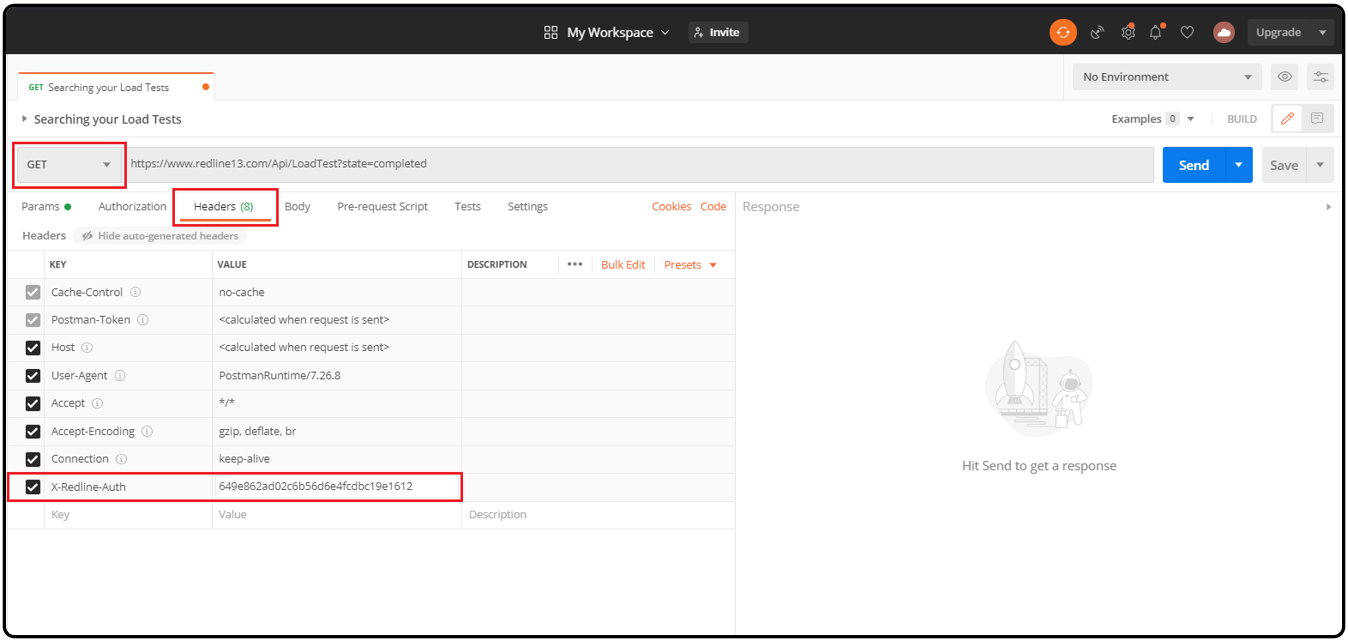
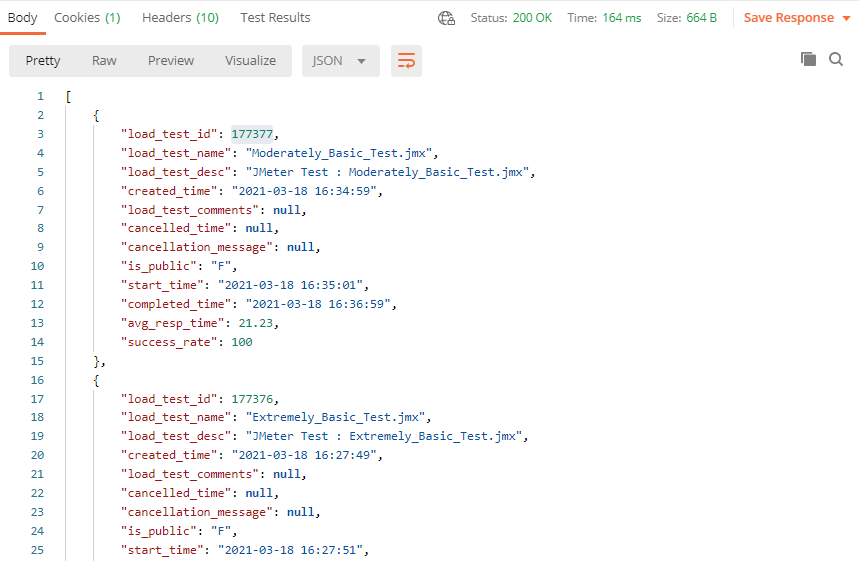
Keep in mind that you will be entering your own unique API key and not exactly the one shown in this example. At this point, everything should be set up and ready for us to test. Simply click on the blue “Send” button in the upper right hand corner and you should be presented with results similar to these:
Using a Scripting Language
Postman is a great tool for getting familiar with the API as well as doing some proof of concept testing. However in real world practice, we’d prefer to use a scripting language as it more easily allows us to invoke API calls based on certain triggers or events. For this example we will be demonstrating how to code this in PowerShell, a popular and versatile scripting language for Windows systems and applicable to many cloud technologies in Azure.
The specific cmdlet necessary to accomplish this is Invoke-WebRequest, with the official documentation found here that covers it in more detail. Creating an equivalent request to the /LoadTest endpoint as described with Postman above, we can write the following code:
Invoke-WebRequest https://www.redline13.com/Api/LoadTest?state=completed ` -Headers @{'X-Redline-Auth' = 'a616c98dfb43530cf218f8b3da972671'} |
The resultant output should closely resemble that of the Postman example above.
Troubleshooting
If you have attempted any of the above but have not been able to reproduce the output described, you may want to investigate some common pitfalls, which include:
- Verify that your account has at least a basic plan. This may present itself as a 403 forbidden error when attempting to access API resources.
- Verify that your API key has been created for your account, and that it is appropriately set using the “X-Redline-Auth” header.
- Ensure that the base URL starts with https://www.redline13.com/Api and that listed resource names are appended after this.
- Check that your query string (if present) is well-formatted, and that all required parameters for the resource you are requesting are present.
Of course, if all else fails and you find yourself stuck, feel free to reach out to our excellent support team and we will do our best to point you in the right direction. Always remember, if you don’t already have a RedLine13 basic or premium plan, you can sign up for a no-cost trial subscription and try these examples for yourself.