Running load tests on IP whitelisted applications can be difficult when load agents get random IP addresses from AWS. This can be particularly difficult when your application is not running in AWS. One solution to this problem is to use NAT Gateways with Elastic IPs. The Elastic IP can be whitelisted with your application allowing the load agents to reach your private targets.
Step 1: Set up VPC subnets (if needed)
- Go to the AWS VPC console (https://console.aws.amazon.com/vpc/home).
- If you do not have a VPC yet, use the “Create VPC” button to create a VPC. (If you don’t have a specific IPv4 subnet you want to use, 10.0.0.0/16 would be a good choice).
- Go to the Subnets tab.
- Click “Create Subnet” and follow the steps to set up a subnet where your load agents will run. This will be your private subnet.
- Repeat this to create a public subnet. Be sure this is set up to use a route table linked to an internet gateway (you can set the route table after creating the route table by selecting the subnet, then using the Route Table tab at the bottom of the page). If you do not have an Internet gateway for your VPC, you can create one at https://console.aws.amazon.com/vpc/home?region=us-east-1#igws:sort=internetGatewayId. If you do not have a route table linked to the internet gateway, you can create one at https://console.aws.amazon.com/vpc/home?region=us-east-1#RouteTables:sort=routeTableId.
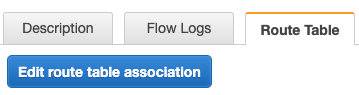
Setting the Route Table
Step 2: Set up your NAT Gateway
- Go to the AWS VPC console (https://console.aws.amazon.com/vpc/home).
- Go to the NAT Gateways tab.
- Click “Create NAT Gateway”.
- Select the public subnet from Step 1.
- Select an existing Elastic IP or create a new one.
Step 3: Set up a Route Table
- Go to the AWS VPC console (https://console.aws.amazon.com/vpc/home).
- Go to the Route Tables tab.
- Click “Create route table” and create a new route table.
- Once created, click “Edit routes” under the bottom “Routes” tab and add 0.0.0.0/0 with a target of the new NAT Gateway.
- Under the “Subnet Associations” bottom tab, click “Edit subnet associations” and associate the private subnet from Step 1.
Step 4: Test your setup
- Go to https://www.redline13.com/StartTest to start running load tests on IP whitelisted applications.
- When setting up load agents under “Advanced Cloud Options”, be sure to pick the private subnet from Step 1 and a Security Group with proper outbound rules.
- If set up correctly, your test should run and be able to reach your whitelisted servers.
You can try for yourself and quickly run your own test on RedLine13.